What is Real?
I contribute to some online forums centered around sharing astrophotography. Periodically, a post on these websites will receive a comment with a request for the photographer to post an unedited image, to which the response is often “what do you mean by unedited?” On other posts, I have seen a skeptic come along and claim the images are faked, computer-generated, or otherwise “photoshopped.” In regards to that last accusation, they are partially correct; you will not find any night sky photo which did not have some kind of edits applied to it (whether purposefully or not), but this does not mean anything about the image was fake.
I also do not mean that fake astrophotos do not exist. Following the Solar Eclipse of 2017 across North America, online forums filled with composites showing enlarged images of totality blending into the skies over landmarks and landscapes which were nowhere near the event. Almost every year claims that Mars will be as big as the Moon, and a heavily photoshopped image paired with it, circulate around social media. Fake images like these deserve discussion, but that is not my main focus for today. Instead, I will discuss the process of taking and editing astrophotos and how this relates to the integrity of the image, or how “fake” they really are.
Cameras
I will start with a general description on how most modern cameras work. Cameras take the analog signal of incoming photons and turn them into a digital image, which is never a completely accurate process. This means the digital sensor of the camera will round a certain amount based on how many photons hit the pixel on that part of the sensor. For example, say you shoot a long exposure of a dim nebula; a few of the pixels on the camera sensor may gather raw values of, say, 3.1, 2.7, and 3.3, since varying amounts of photons are hitting those pixels. However, (digital) cameras do not allow fractions in these values, so all of these pixels round to a value of 3, meaning we have lost some information in the image (this is called “Quantization Error”).
A good way to deal with this is to amplify the signal the camera receives; this is where “Gain” comes in. A Gain setting acts as a multiplier across the sensor. If you are used to using a DSLR, you may be more familiar with the term ‘ISO.’ Taking the previous example, say we turn up the Gain to 10x; this would cause our previous pixel values of 3.1, 2.7, and 3.3 to become 31, 27, and 33, which are all round numbers not requiring rounding, and they contain a decent amount of contrast.
This is not without its drawbacks; too high of a Gain setting could result in the image being overexposed. If we turned the gain up to something which multiplied the digital values by 100x, our pixels reading 3.2, 2.7, and 3.3 would read as 320, 270, and 330. If such an image was taken on a camera which is limited by 8-bit values of 0-255 (2^8 = 256 total values), 320, 270, and 330 are all the same - pure white, meaning we have again lost information.
Many people would incorrectly describe Gain or ISO as an adjustment of camera sensitivity; think of it instead as an amplifier to the signal (and the noise) which is already there. Gain at its basest is a useful tool which trades between quantization error and dynamic range, sacrificing one for the other as needed to produce a better image.
This entire process happens as you take a picture, so there really is no such thing as an unaltered image. Cameras represent the objects you photograph as best they can (whether you are shooting a galaxy or a family portrait), but even from the start they will never be completely accurate.
Dynamic Range
If you have ever wondered why images of the Moon landings don’t show any stars in the sky, the answer lies in limitations of dynamic range (or NASA hired Stanley Kubrick to fake everything). The core issue is that despite our best efforts, cameras have woefully limited dynamic range as compared to our eyes, which is the depth of pixel values separating black and white.

Stanley Kubrick insisted they they should film on location for realism, so NASA still ended up going to the Moon anyways
As partly discussed in the section above, digital cameras have a bit-depth, meaning the space between black and white can be defined as a number, such as 0-65535 (16-bit, or 2^16 = 65536 values). 65535 in this case represents a pixel which is completely white. Cameras also have a property called a well depth, which can indicate how many electrons each pixel can hold before reaching this point.
The issue is the relative brightness between the Moon or a sunlit space station and background stars is magnitudes higher than what most cameras would be capable of capturing at the same time, except under specific conditions.
My image of the Moon can illustrate this point. This image shows a thin crescent Moon, the “dark” side of the Moon, and even some background stars (which I have circled). This image is, at least as accurately as I could reasonably make it, what my eyes could see through the telescope eyepiece. The camera tells a different story. To the camera, the 1/500th” exposures used for the sunlit crescent insist that this sliver of the Moon is surrounded by darkness. The 1-second exposures, however, show the dark side of the Moon but see no detail on the sunlit crescent, because to the 1-second exposure, this part of the image is entirely white. The truth is found in both of these, and the final image is a result of blending these two exposures together.
Is this image Photoshopped? Yes, thoroughly, in fact. Is it fake? Not at all - and for this image, the final result is almost as good as what my eyes were able to see.
A thin Moon and some visible background stars
Long Exposure Photography
Taking photos of the Moon or the planets is the one area of astrophotography where cameras often have more difficulty than the our eyes in capturing detail. As a planet shimmers through the air, our eyes can often pick out little details here and there, but cameras often require thousands of exposures to capture only a few sharp images. Deep sky imaging via long-exposure flips this rule on its head. Long-exposure allows cameras to play a waiting game - no matter how dim an object it, if you keep the shutter open for a long enough time, you will eventually capture a signal (photon) from it. Our eyes do not work this way and, though they can become incredibly sensitive when adapted to dark conditions, they simply cannot match the signal gathered by a multi-minute long-exposure image.
Is long-exposure “real,” then? I think this is when the question itself becomes unfair. Cameras are designed to collect photons in this manner, and in the end, cameras still capture light within the same bandwidth visible to our eyes (within some margin of error - more on that further down). As long-exposure is also used for some daytime imaging (of waterfalls and such), holding astrophotography to a different standard would seem unfair.
Image Stacking & Noise Reduction
On most astrophotography forums, astronomers sharing their images usually also share some detail on the capture of the object, such as what telescope and camera was used, how it was processed, calibration files in use, and total integration time. The last two items in this list are of interest here, as these two parts of astrophotography have garnered many comments by skeptics on the integrity of these images.
Integration refers to the total time of all images taken of your night sky object of choice; take 30 five-minute exposures of a nebula and your integration time is 2.5 hours. Most night sky objects appear static for multiple human lifetimes, so photos can be repeatedly taken of many objects without fear of them moving. Many of my night sky images are the culmination of data taken over several nights, and other astrophotographers have been known to continuously add more data to an object over the course of several years. Astrophotographers usually need to take more than one photo due to camera noise, which is the grain-like texture seen in the darker areas of photos, and a lot of effort in both image capture and post-processing is used to reduce this noise.
The first tool we use for noise reduction is image stacking. The multiple astrophotos taken are first aligned (to account for any errors in tracking) and then all of the images are averaged together. This means that much of the noise in the photo, which I will describe as a random variances in pixel values, will be different on each image, but the pixel values of the night sky object will be mostly the same. At the end of this process you have a (hopefully) smooth image devoid of most noise, and the image integration time is then used to impart the approximate quality of the resulting signal-to-noise ratio (SNR). This technique can be used in daytime photography as well for any target which is relatively static, and I frequently use it to increase the SNR of my wildlife or weather photos.
A single exposure of Mammatus Clouds (Left) and 10 of these exposures stacked together (Right) taken in May 2019
The other tool is using calibration images, which is a way of using predictable properties of the camera against itself to further reduce noise. While some noise in each image is random, some is also fixed, meaning the noise pattern will be (mostly) recurring, and this means it can be removed. Capping the telescope and taking exposures of equal length to the ones just taken of the night sky will capture only this pattern noise. These calibration images, imaginatively called “Dark Frames,” can then be subtracted from our night sky photos before then aligning and stacking the images as described above. This method makes stacking much more effective and can also remove problematic hot pixels. Astronauts on the International Space Station often use this technique as many of their cameras have damaged pixels from cosmic ray strikes and this allows their photos to have overall lower noise. The more dedicated (read as: less financially constrained) astrophotographer may also used a camera with an electric cooler; since camera noise increases with temperature, cooling your camera to well below the freezing point of water means that your images may be mostly noise-free from the start.
This may sound like a lot of work, but removing noise through software like Photoshop is sometimes only partially effective, or it may require enough micromanagement of the process that you may wish you had simply just taken some Dark Frames in the first place. Since deep sky targets can be treated as static and unmoving, taking multiple, calibrated images (as well as some further noise reduction in post) is an excellent method to removing obstacles caused by the camera in favor of the real detail floating in the heavens (which is the actual target).
Linear v Non-Linear Images
If you ever see someone list their workflow for working on night sky images, you may encounter the term “Stretch” or some indication of moving the image from something called “linear” to “non-linear.” This refers to applying applying a curve to the image in order to brighten certain areas more than others.
Cameras record their data in linear form, meaning each variance in brightness falls along a straight line between 0 and whatever number is considered “white” to this camera (such as 255). If a bright star core has a value of 30, a star twice as bright will have a value of 60. This also means that an untouched night sky image made from an astrophotography stacking program will be almost completely black. If your image captured bright stars, you may seem them, dimly, but overall the image will be quite dark and you may wonder if your night’s worth of effort taking photos of the stars was wasted.
In contrast to cameras (think “addition”), our eyes work more closely to a logarithmic curve (think “multiplication”), and we apply a similar curve to night sky images. This brightens the darker regions and increases their contrast, and if done correctly, the brighter parts of the image (cores of stars, brighter nebula, etc) are only minimally affected. I will note that applying a non-linear curve to an image does corrupt most scientific value that the image may have, so if you are searching for supernovae or watching for exoplanet transits, best leave the image alone for the most part.
Linear and Non-Linear comparison of the Jellyfish Nebula (IC 443), with the applied Curve shown in the middle
We go back to our original question, then - are stretched images real? I will still say yes, both due to the fact that an applied light curve is closer to the performance given by our squishy eyeballs and also because, as with Gain, your camera actually does this to the image before you even see it. If you shoot in Camera Raw, this curve is simulated on the camera screen but is not permanently applied, and this is what enables editing of the white balance and other aspects of the image. If you are shooting straight to JPG (not advised for astrophotography due to heavy loss of data), this light curve is applied by the camera itself to your image. Remember, there are no such things as unaltered images.
Gradient Reduction & Color Balance
Light Pollution is one of Astronomy’s biggest obstacles. Even with a perfectly clear night, nearby sources of light can introduce gradients and color bias into an image which require removal for color accuracy. This is done in different ways depending on the software in use. In Photoshop, you can heavily blur a copy of the image and subtract it from the original, which should result in a removal of the orange or green color cast on the image, or you can use a plug-in like GradientXTerminator which automates much of the process with good results.
PixInsight, a dedicated astrophotography image processing software suite, has a slightly more technical method involving using sample points placed all over the image to model a background, which is then subtracted. The end result should be the same when performed correctly; often times a heavily light-polluted image will hide your night sky target completely, but after subtraction it should become quite visible.
Color correction is usually required as well. Our atmosphere scatters light in different ways depending on the wavelength, and the color bias introduced by light pollution can affect the overall color of the image. Once gradients are removed, the image must be color balanced. An easy way to do this in Photoshop is to simply use a grey point on the empty background of space since it tends to be a neutral grey color. Setting this grey point will automatically create an adjustment in Curves to darken or brighten the different color channels and the result usually only requires minor tweaking to remove residual background color.
PixInsight offers a few different methods, but my favorite by far is Photometric Color Calibration. This process will plate-solve the image, which involves matching the image to a database of star positions, enabling PixInsight to find the coordinates of the image. This process will then identify a certain type of star in the image (such as a Type G2V star, which matches the color of our sun) and color balance the image based on that star.
The Heart Nebula (IC 1805), shown before and after removal of yellow light pollution gradients and a color balance
Broadband versus Narrowband
One of the more convenient aspects of night sky imaging (and existence in general, I suppose) is that the universe is largely made up of only a few elements. If you pick 100 random atoms in the universe (of normal matter, that is, though if you can find some dark matter I know of some physicists who would be interested), chances are 75 of them will be hydrogen, 23 will be Helium, and then the rest of the periodic table will be crammed into that last 2%.
This means that many of the objects in the night sky that I photograph tend to be made of hydrogen. Hydrogen atoms making up large clouds in space will often become excited by the radiation of nearby stars, which causes them to ionize, and then as their electrons fall into a lower energy level, they release photons at the specific wavelength of 656.28nm, which is called Hydrogen-Alpha (Hα). If you’re just here to read about the cool photos I take, this is a complicated way of saying that hydrogen glows in a specific deep ruby-red light. On a side note, DSLR cameras have some difficulty in photographing these objects. DSLRs are made for daytime photography and most include an IR-cut filter to reduce sensitivity to red light. Some astrophotographers, myself included, have this filter removed, enabling much higher sensitivity to red light. Without this filter, regular photography is still possible, but it does require setting a new white balance.
By using a narrowband filter which isolates this red hydrogen wavelength I can enhance my deep sky images with greater contrast, better control of stars, and greater overall detail. Astrophotographers call this HαRGB imaging, meaning that the Hα data has been added to the broadband color image both in the Red channel for color and then as Luminosity to enhance contrast and detail. Hα is well inside the visible spectrum that we can naturally see, but that specific wavelength is usually lost in the noise of all of the other nearby wavelengths of light streaming into the camera.
As you can see from this comparison image of the Flaming Star Nebula (IC 405), the broadband portion certainly shows the nebula and its color, but the additional Hα reveals significantly more background dust and the nebula takes on an ethereal and ghostly appearance.
The broadband image captured a generous amount of background stars, but many of these bloated, meaning the signal received on the camera sensor from these stars spilled over into neighboring pixels. The Hα image, however, shows much smaller stars since the filter inherently rejects so much light. This allows the final image to appear much cleaner and more accurate.
The Flaming Star Nebula shown in both broadband color (upper left) and HαRGB (lower right)
False Color Imaging
Hydrogen is not the only wavelength used by amateur and professional astronomers; we have a variety of other wavelengths at our disposal, often including Oxygen-iii (doubly-ionized Oxygen) & Sulfur II. Professional observatories use many others including Carbon (useful on comets), and solar observatories use many more, including Magnesium and Sodium wavelengths to study out home star.
Oxygen is particularly useful in creating higher contrast images of planetary nebula. Planetary nebulae are formed by older stars shedding much of their mass into a nebula during their transition into “retirement” as white dwarf stars. Oxygen is naturally formed as part of stellar nucleosynthesis, so these types of nebula will typically have a strong signal in Oiii, which is a wavelength of light of a cyan or turquoise color. Just as many astrophotographers will add Hα to their Red channels, Oiii can be used to enhance both Green and Blue.
Sulfur may seem like a weird choice, but if a night-sky object is rich in this wavelength that can indicate it is old, since Sulfur is only generated late in the process of solar fusion. The shock-waves of Supernova remnants are often quite bright in the Sii line, which is another red color closer to infrared than Hα (though one still within the spectrum visible to our eyes). Sii could be used to enhance the Red channel of an image as with Hα, but Hα typically receives a much stronger signal overall.
Enhancing broadband color is not the only function of these narrowband filters; many astrophotographers simply skip broadband altogether. Every color image is simply a combination of Red, Green, and Blue, and we happen to have the 3 filters of Hα, Oiii, and Sii. Mapping these filters to Red, Green, and Blue, we can then create a color image - one which both displays concentrations of these elements within the nebulae and which allows the more artistic astrophotographer to experiment with new color combinations. Some astrophotographers don’t have much choice here either. Many living in population centers experience levels of light pollution which make long exposure in broadband a futile effort. Narrowband filters, however, reject many of the wavelengths produced by streetlights (for now, at least; narrowband filters offer much less rejection of LED lights), enabling those “stuck” in cities to still photograph the night sky. I will note that not every night sky object is responsive to narrowband wavelengths. Galaxies in particular are primarily broadband targets and will narrowband filters will do little to help.
The Hubble Space Telescope famously photographed the Pillars of Creation in a false color combination we call SHO, or the “Hubble Palette.” SHO refers to the order of the filters, with Sii as Red, Hα as Green, and Oiii as Blue. Other popular combinations, such as HSO, or even HOO (called “bicolor,” this combination leads to a fairly natural nebula and star color) are commonly used as well depending on the preference of the photographer and the availability of data.
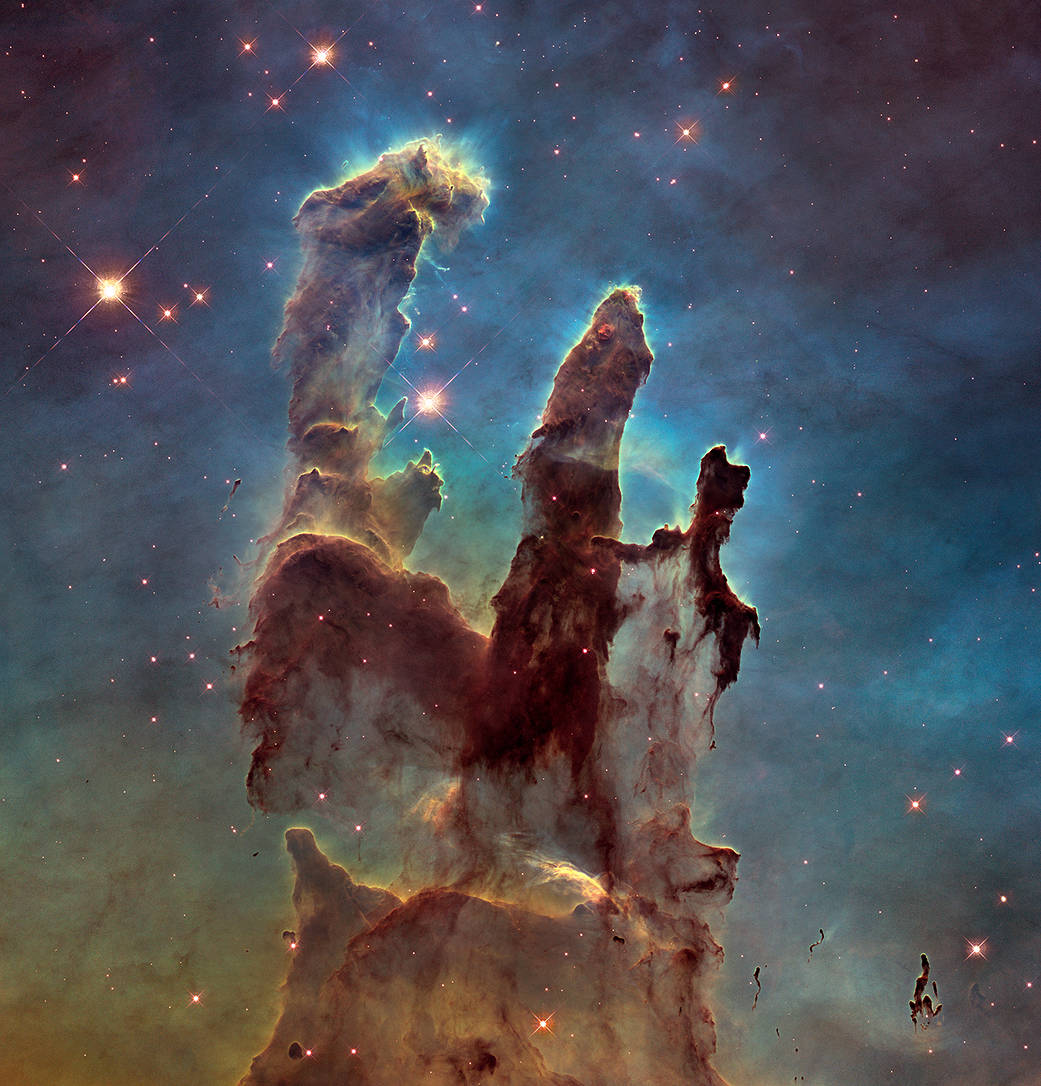
The Pillars of Creation in the core of the M16 Eagle Nebula as taken by the Hubble Space Telescope. Presented in the SHO palette
My image of the Jellyfish Nebula (IC 443) shows more defined separation in colors, and the colors have been mapped in the same SHO combination. This is a supernova remnant, or a nebula consisting of material ejected from a star which exploded at the end of its life. With this combination we can see that Sii and Oiii dominate the leading edges of these shockwaves while much of the background nebula is green, indicating the presence of Hydrogen. This makes sense considering that Sulfur and Oxygen are formed late in the process of stellar evolution, so shockwaves of matter ejected from a dying star will naturally contain heavier elements. None of this would be as apparent in a broadband color image, however, and this nebula would be dominated by the natural red of hydrogen with only minor blue color contributions from oxygen.
Closeup of the Jellyfish Nebula (IC 443) in SHO. Note that the leading edges of this supernova remnant are blue, indicating concentrations of Oxygen
Distinguishing between enhanced broadband color (or just regular color) and false-color is fairly easy once you have seen a few images of each type. Most broadband-based images of nebula will be predominantly red or blue since most objects in space emit light under the black body spectrum of radiation. In simpler terms, unless you’re looking at a comet or a wide-field image of the Milky Way (as some of these images contain naturally green air glow), you probably won’t see any green in broadband images. The existence of false-color in general has led to some claiming that all astrophotos are the result of artificially-added color, but in reality most of the images captured by backyard astronomers are based in the broadband spectrum. False color images, depending on how they are mapped to color channels, will typically include more “exotic” colors, brilliant blues and oranges, purples and pinks, and of course green.
In the end, the colors we see are simply how our brains interpret various wavelengths of light. Some people are not sensitive to specific bandwidths. While fortunately rare, some are entirely colorblind. Children can often see further into the near-ultraviolet spectrum than adults because our corneas yellow as we age. Some animals have eyes which are much more sensitive to Infrared or Ultraviolet than ours. It seems “real” is both a subjective and moving target. There is no denying that working with these false-color combinations can bring out the more artistic side of an astrophotographer, but but you can be assured that even if you see a false-color image, it still represents the reality of the night sky object.
The Jellyfish Nebula (IC 443) in (Left to Right) HαRGB, HOO (Bicolor), and SHO
Non-Optical Wavelengths
Finally, we can also observe our reality in wavelengths outside the capabilities of our eyes. Many professional observatories study the night sky in radio, microwave, infrared, ultraviolet, and even X-Ray emissions. You might even observe certain parts of the radio spectrum on your drive to work as you listen to music, and the first image of the black hole in M87 was taken in radio wavelengths. Visually, we cannot see these wavelengths, but they help us with communication, food preparation, warmth, chemical bonding, and medical imaging (among many other applications).
Applying non-optical wavelengths to astrophotography is rare on consumer-grade levels. While many professional observatories study the night sky in non-optical sections of the electromagnetic spectrum, your average backyard observer will never leave the broadband visual range and if they do, their efforts are often directed towards making a simple radio telescope for picking up sounds from the Sun and Jupiter.
As seen on this composite Hubble image of Jupiter, non-optical wavelengths can still be represented in our visual range, such as revealing Jupiter's “Northern Lights” in ultraviolet. A more familiar example may be the use of thermal imaging cameras, which transpose parts of the infrared spectrum into optical wavelengths so that the resulting colors indicate a range of temperatures. As with other types of false-color imaging, remember that this is a representation. We may not be able to see it, but the tools we have crafted to extend our limited organic vision can see it just fine and are able to show us more parts of reality than our eyes are designed to see.

Jupiter, taken by the Hubble Space Telescope in broadband color along with Ultraviolet details of Jupiter’s Aurora
Final Thoughts & Artistic Integrity
Each step in astrophotography, from taking the first photo to exporting the final image is based around increasing the signal-to-noise ratio of the data. Astrophotographers work through many obstacles, including light pollution, camera noise, and atmospheric blurring, among others, to produce the best representation of their night sky object of choice.
Despite our best efforts, each photo we take, whether of the night sky or anything else, is simply the best guess made by a camera which has been made to emulate our natural human vision. In my opinion, as long as you are not trying to claim that a 1500mm Lunar image pasted onto a 20mm landscape is “real,” keep on taking photos of the night sky.

This is certainly still art, but it is nowhere near a representation of reality